As the most commonly used data storage and transmission medium, USB drive is widely used on various occasions. It can store diverse types of files, such as photos, videos, documents, music, etc. However, sometimes there may be such a situation: when you insert the USB into the computer, you find that the files and folders in the USB drive are not displayed. Why does this happen? Have the original files been completely deleted?
Why USB Drive Files Not Showing Up
Many factors can cause files on a USB drive to not show up, ranging from simple connection issues to true file loss that requires the use of free data recovery software.
- The files you want are stored in another partition of the USB drive instead of the current one.
- The USB drive files and folders are hidden.
- The files and folders were deleted due to human factors, virus infection, violent removal, and so on.
- The file system or partition table of the USB drive may be corrupted.
To make your files and folders visible again or to recover them if they have been deleted, you can follow the instructions below.
How to Fix USB Drive Not Showing Files and Folders on Windows 10/11
Fix 1. Connect the USB Drive to Another Computer
When your files on the USB drive are not showing up, you may consider connecting the drive to another computer.
Sometimes, antivirus or other software on your computer may prevent files/folders from showing up. Also, some computers may not correctly recognize all of the USB drive’s partitions for various reasons. If your files show up on another device, you can try turning off antivirus software or performing other troubleshooting steps.
Besides, if you have multiple partitions on your USB drive, you need to make sure you are looking for the files in the correct partition.
Fix 2. Unhide USB Drive Files
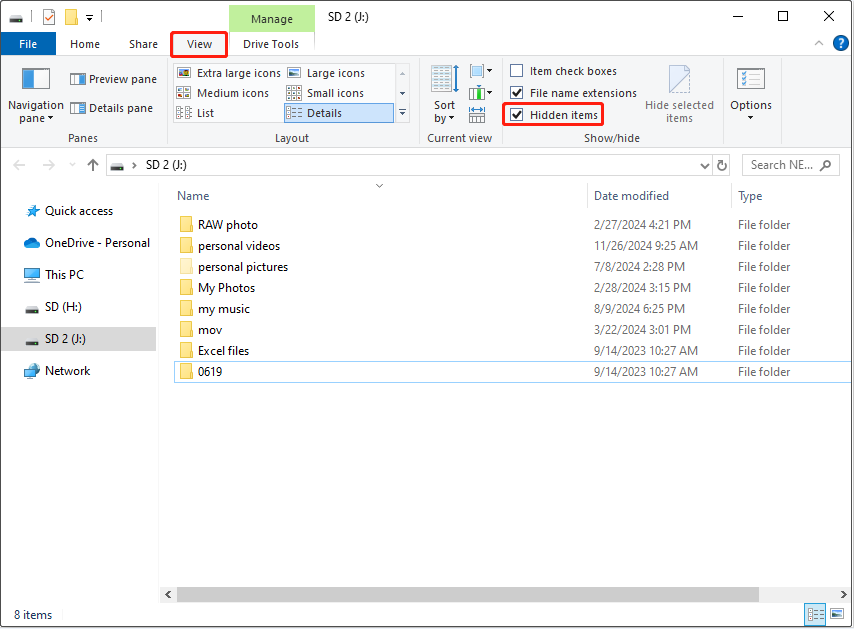
Files or folders with the hidden attribute set to them will not be visible. You can adjust the folder options in File Explorer to show hidden files.
Step 1. Open File Explorer.
Step 2. Go to the View tab, and tick the option of Hidden items.

Step 3 (optional). If you want to unhide the hidden files and folders, select them, and click Hide selected items.
Fix 3. Recover Deleted Files on USB Drive
When the files and folders are not simply hidden but being deleted, you need to use data recovery tools to recover them. MiniTool Power Data Recovery is the best data recovery software you can try.
It stands out from other recovery software on the market due to its extensive support for various data types and file loss scenarios, multi-functional capabilities, secure disk scanning and file recovery process, and 1 GB of free data recovery capacity. You can use it to recover deleted files from USB flash drives and other file storage media.
Now, download the free edition of this tool from MiniTool’s official website, and then launch it to recover files.
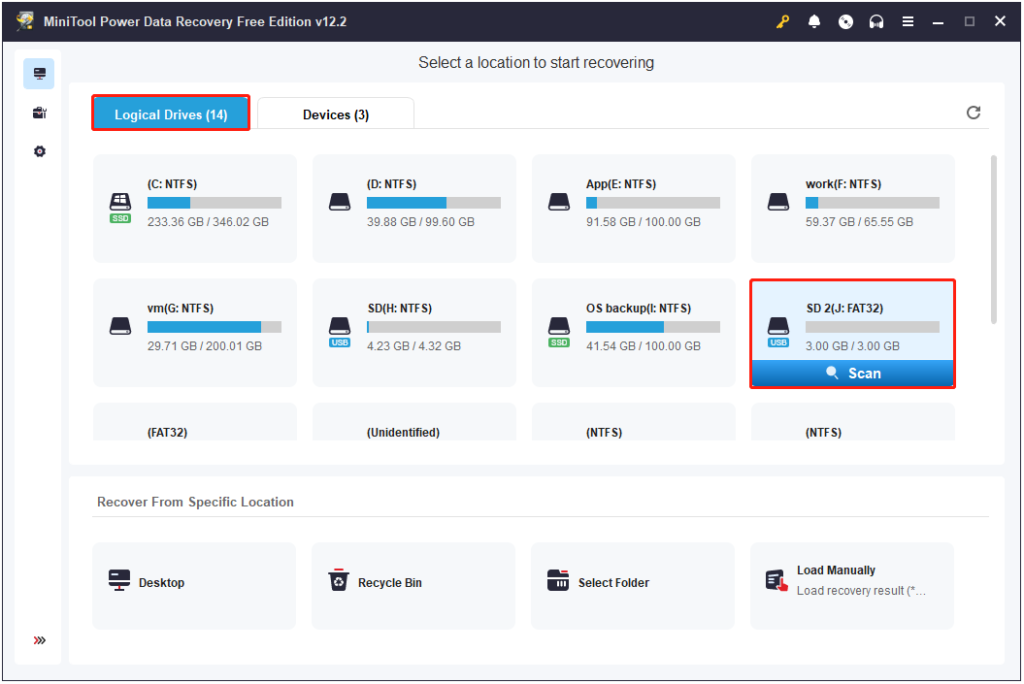
Step 1. When you see the main interface of MiniTool Power Data Recovery, under Logical Drives, select the USB drive partition from which you need to recover files and click Scan. All the USB drive partitions are marked with a USB icon.

Supposing you need to recover files from multiple partitions, to prevent secondary disk scanning, you can go to the Devices tab to scan the entire disk directly.
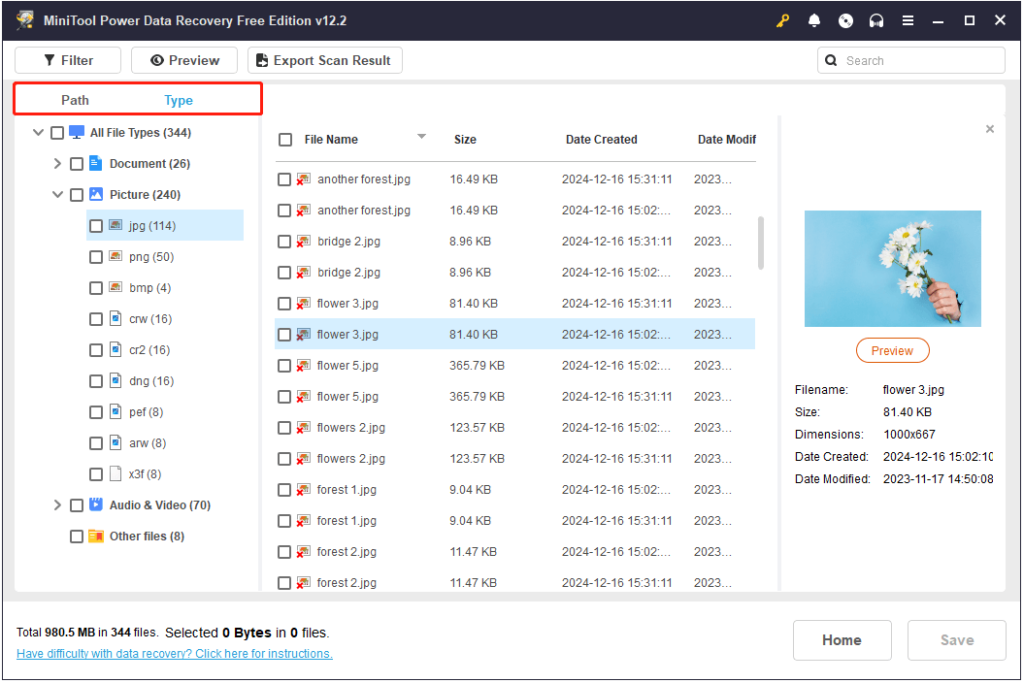
Step 2. Once the scan is done automatically, you can make use of several useful features in this secure file recovery tool to narrow down the file scanning results and locate the desired items quickly.
- Path: This tab displays all files by file path and original folder structure in most cases. Typically, the wanted items can be found in the Lost Files or Deleted Files sections.
- Type: Under this category, the found files are listed by file type and specific file format. This suits you when you want to recover certain types of files.

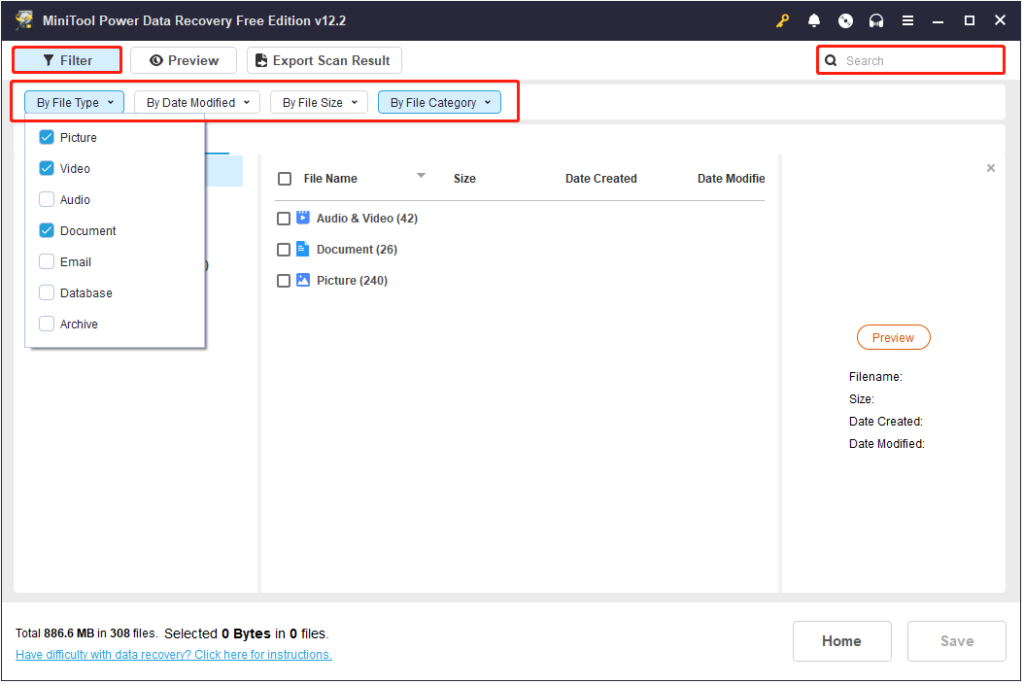
- Filter: This feature allows you to further narrow the file range. In addition to file type, you can also set other filtering conditions, including file size, file modification date, and file category. Click the Filter button in the top left corner and specify the filtering rules at once.
- Search: The search box in the upper right corner is used for accurate file search. Just type the keywords of the file name in the search box and press Enter to get the search results.

Step 3. Double-click on each file you want to recover to preview it for confirmation.
Step 4. Finally, click the Save button from the bottom right corner. Then you will be prompted to select a location to store the recovered files. Do not store them in the original USB drive in case of data overwriting. If you used up the first 1 GB of free file recovery capacity, you can go to MiniTool’s store to upgrade the software.
After recovering the files, you can check your USB drive for problems to avoid the issue of the USB drive not showing files again. Common measures include scanning for viruses, checking for file system errors, formatting the USB drive, etc.
Conclusion
To sum up, this tutorial focuses on the USB drive not showing files and folders issue on Windows. You can follow the guide above to display or recover your files.