Got some lost data on your Windows computer? Do you want to know how you can get them back? If yes, then we have the answer for you. In this post, we are going to show you how to recover deleted data on Windows computers without affecting those existing data that you have.
Deleted data on your Windows computer can really be a problem most especially if those data are really important. And a lot of users are really struggling on finding a possible way if they can still get back those deleted data from their Windows computer. Well, if you are one of those people, then worry no more. Because we are going to show you a way on how to recover deleted data on Windows computers.
The methods that we are about to show you how to recover deleted data on Windows computers are very easy and safe to do. Now, it will be up to you on which of the following methods that you are going to use in order for you to get back all of those important data that has been deleted from your Windows computer.

Part 1: How to Recover Deleted Data on Windows? – Can I Really Still Get Them Back?
Recovering any lost data on your Windows computer is really possible. However, when you accidentally format or deleted certain data on your Windows, you have to make sure to stop using your computer. This is for you to not overwrite those deleted data. Yes, that is right! Those deleted data are still there on your computer and using your device before recovering them can overwrite them and if that will happen, then you can no longer recover them.
When you delete a certain file on your computer, it will only first be hidden from you visually but the truth is, those deleted data are still there on your computer. This is now the reason why you can still get back those deleted data that you have on your Windows computer.
Part 2: How to Recover Deleted Data on Windows Using A Data Recovery Software
Now, one of the best ways for you to recover a deleted data or file on your Windows computer even if you cannot see them on your Trash Bin is by using a data recovery software. And with that, we have the perfect tool that you can use and that is the FoneDog Data Recovery tool.
The FoneDog Data Recovery is the best data recovery tool that you can use on your Windows computer to recover any type of data such as your photos, videos, documents, emails, audios, and so much more. And one of the best features of this data recovery tool is that it does not only work for Windows computers but it can also work on external devices such as USB drive, memory card, and external hard drive. Plus, it can also work on a Mac computer.

This is one very easy to use tool to get back those lost data on your Windows. Also, using the FoneDog Data Recovery to get back any lost data is very safe because it will not overwrite any other data that is existing on your computer so you do not have to worry about anything.
And with that, here is a quick guide that you can use in order for you to know how easy to use the FoneDog Data Recovery is.
Step 1: Open Up Tool on Windows PC
After you have successfully downloaded and installed the FoneDog Data Recovery on your Windows computer, you can now go ahead and double-click on it for you to launch it.
Step 2: Select Data and Storage
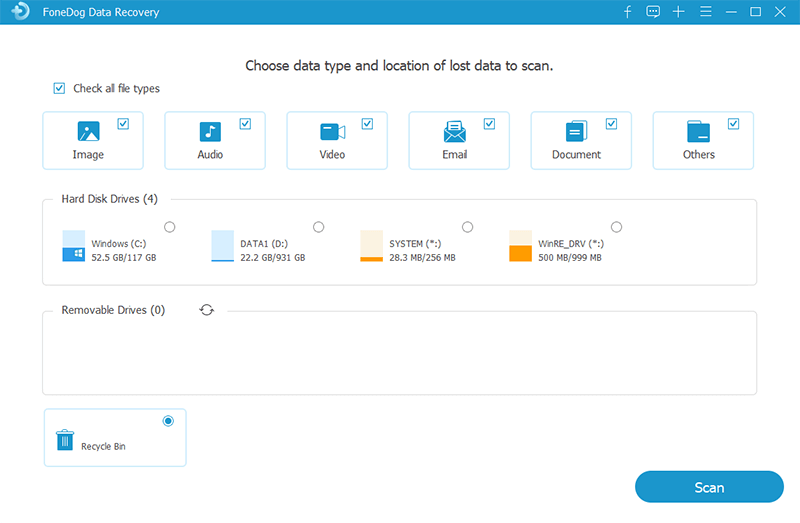
Then on the main interface of the FoneDog Data Recovery, you will see different file types that you can recover on your Windows computer. Here, simply click on the data type and the location as well where you want to recover those data types that you have chosen.

Step 3: Scan Your Windows Computer
After choosing all the things that you need, the next thing you have to do is to scan your Windows computer. And to do that, all you have to do is to click on the Scan button on the lower right corner of your screen.
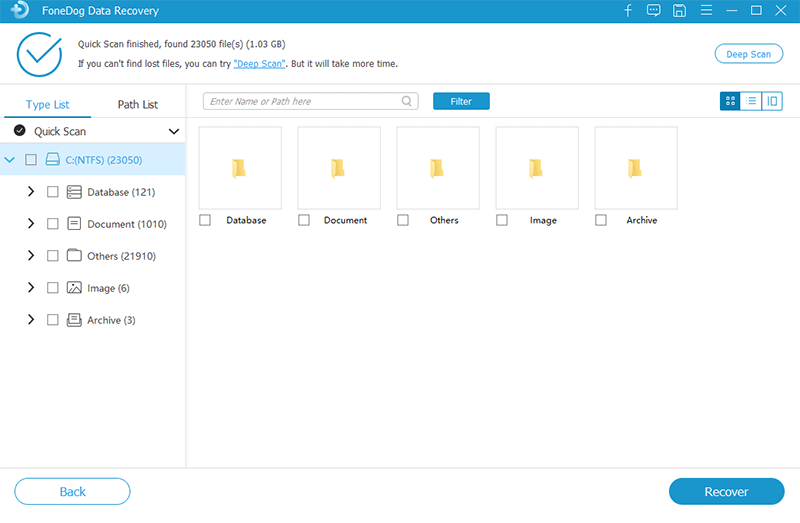
In this stage, there are two ways on how you can scan your Windows computer. One is through a Quick Scan, and the other one is the Deep Scan. Choosing the Deep Scan process for your Windows can take a longer time than doing the Quick Scan. However, this can give you more results for you to recover.

Step 4: Preview Scanned Files and Choose
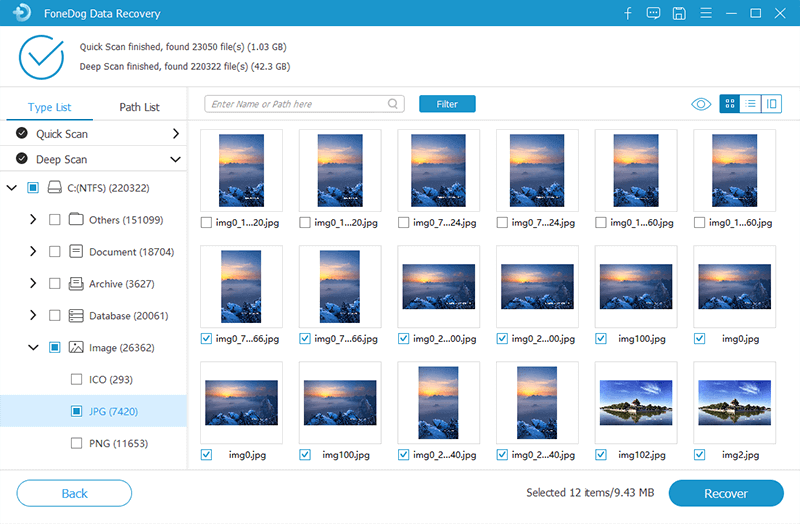
Then, after the scanning process, go ahead and preview those data for you to make sure that you have the right file. You can also choose the data that you want to recover on your Windows computer as well. This is by clicking on them one by one.
Step 5: Recover Deleted Data on Windows
Then, after choosing all of the files you wish to get back, then you can now go ahead and get them back. Do this by simply clicking on the Recovery button right below your screen and the FoneDog Data Recovery will start to recover those files that you have chosen.

Part 3: How to Recover Deleted Data on Windows Using Built-In Features
Aside from using a data recovery tool to recover those deleted data on your Windows computer, there are also some built-in features on your Windows that you can use.
Method #1: Recover from Trash Bin
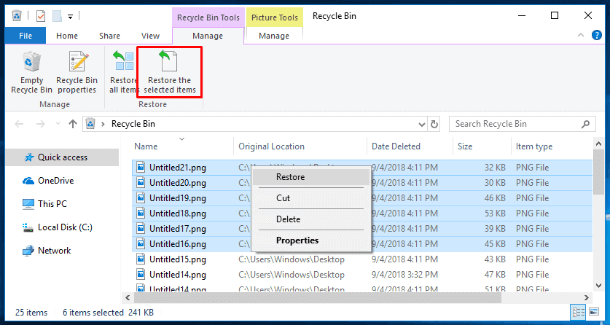
Every Windows computer comes with a trash bin. This is the folder on your Windows where all of your deleted data is put to. When a deleted data is put into this folder, you can still have the chance for you to restore those data easily. Here is how you can do this.
- Step 1: Go ahead and launch the Trash Bin on your Windows computer.
- Step 2: Then look for the data that you want to recover.
- Step 3: Once that you have located that data, go ahead and right-click on it and then click on the Restore option.
- Step 4: Then the chosen data will be restored on your Windows computer and be back to the folder where it was deleted.

However, if in case that the file you are looking for is not found under the Trash Bin folder, then that means you can no longer have them recovered using this method. But you can still use the FoneDog Data Recovery for you to recover those data.
Method #2: Using the Previous Version
If in case that you have already deleted all of the items that you have on your Trash Bin folder and you wanted to recover a certain file, then another thing that you can do is to use the older version of the file that is deleted by using the backup and the restore built-in function of your Windows computer. And for you to do that, here is what you will be needing to do.
1. Windows 7 Computer
- Step 1: Simply click on the Start button and then choose Computer. Then go the folder where the file you want to recover has been deleted.
- Step 2: After that, go ahead and right-click on that folder and then choose the Restore Previous Version button.
- Step 3: Then on your screen, you will be able to see a list of available versions of the files that you want to recover. From here, click on the version that you want and then click on the Restore button.
2. Windows 10, Windows 8.1, and Windows 8
- Step 1: Launch the folder where the deleted file was located and then choose the History option.
- Step 2: Then the File History will be shown on your screen that has the recent backup of your folder.
- Step 3: Then, click on the Previous button for you to be able to find and at the same time, choose the data that you want to recover.
- Step 4: Once chosen, go ahead and click on the Restore button for you to get back that deleted data.
Part 4: Conclusion
So, these are all of the methods that we have for you to know how to recover deleted data on Windows computers. These are all very easy methods that you can do on your own. You can take advantage of the features that you already have on your Windows computer.
However, if you want to make sure that you are going to get back all of the deleted data that you want to recover, then what we can highly recommend is to make use of the FoneDog Data Recovery tool. This way, you will be able to recover those deleted data even if they are no longer found on your Trash Bin folder and even if you do not have any backups.