Basically, Memory cache is just like a separate reserved section of memory to keep the data that is retrieved often for faster access in the future. This Memory caching is most effective in web browsers because most users access the same web pages over and over. So, by caching as much of this information as possible that include decoded images, application user interface elements and secure (https) pages in a faster accessible location like ‘Browser Cache Memory’, the browser need not rerender them to be re-displayed.
In Mozilla Firefox, the two about:config preferences that mainly control the Browser Cache Memory are
- browser.cache.memory.enable
- browser.cache.memory.capacity
Controls whether to use memory to cache or not
This preference controls the maximum amount of memory to be used for caching.
First of all let’s modify the Firefox preference settings to enable memory caching and then set the maximum memory to use for caching.
Enable Memory Caching in Firefox
1. Open Firefox and in the location bar(also known as the Address Bar, URL Bar or Awesome Bar) type about:config and press Go(->)

Type about:config in the address bar
This shows a warning message alerting users to be careful while changing these advanced settings. Click I’ll be careful, I promise! to bring up the about:config preferences list.

‘be careful changing these advanced setting’ warning message
2. Find the Preference named browser.cache.memory.enable from the list. Its better to take the help of the filter field at the top. Just type in browser.cache.memory.enable in that Filter field to directly displays that Preference for you.

Preference Name: browser.cache.memory.enable
By default the value of this preference is set to ‘true’, but if its set to ‘false’ in your browser just double-click with your mouse on it to toggle the value to ‘true’.
Set the Maximum amount of memory to use for caching
The preference named browser.cache.memory.capacity which controls this setting does not exist by default, so lets create it now!
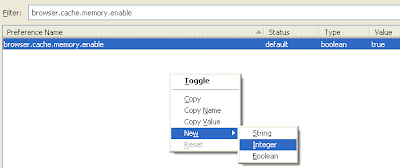
1. Right click with your mouse in the empty space and choose New > Integer

create New > Integer Value
2. In the New integer value box that shows up, Enter the preference name as browser.cache.memory.capacity and press OK

Enter the preference name as browser.cache.memory.capacity
3. Now, it prompts you to Enter integer value of browser.cache.memory.capacity preference

Enter Integer Value
The integer value you enter represents the maximum amount of memory in KB to use for caching. This value should be decided based on the total amount of RAM available. The default values to enter are as follow:
| Available Physical RAM | Memory Cache (in KB) |
| 128 MB | 6144 |
| 256 MB | 10240 |
| 512 MB | 14336 |
| 1 GB | 18432 |
| 2 GB | 24576 |
| 4 GB | 30720 |
| 8 GB and more | 32768 |
If you have no problem with Firefox’s memory consumption then you can raise the integer value to use more memory for caching which reduce the load time even more.
Now Exit Firefox and restart for the change to take effect.
That’s it!! From Now on wards you will notice a dramatic reduction in the load time of previously visited pages and dialogs in Firefox.