This “Autoplay” feature in Windows, is a security threat to your PC as some malicious program code hidden on a CD or other removable devices can be easily installed on your computer without your knowledge or consent if it is enabled. So, to enhance the security of your Windows PC, it is recommended that you disable this feature.
This can achieved either with a simple Registry Tweak or Editing the Group Policy settings.
Disable “Autoplay” Feature in Windows XP Using Group Policy
1. Click Start, click Run and type gpedit.msc and then click OK. This open the Group Policy Window.

gpedit.msc – Run Command
2. In the left pane of the Group Policy window, expand Computer Configuration -> expand Administrative Templates, and then click on System.

Group Policy Window
3. In the right pane under Settings, find the policy setting “Turn off Autoplay” and double click on it (or) right-click and choose Properties.
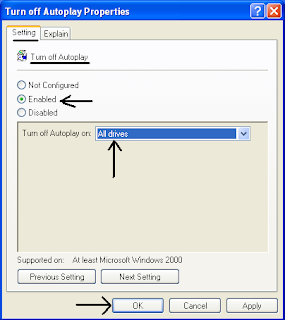
4. From the Turn off Autoplay Properties window, change the setting from ‘Not Configured’ or ‘Disabled’ to Enabled, and select All drives in the “Turn off Autoplay on:” drop down box and then click Apply -> OK.

Turn off Autoplay Properties Window
This disables the Autoplay feature on all the drives attached to your PC. Alternatively you can choose CD-ROM or other options if you want to disable Autoplay feature only on certain removable storage devices.
5. Now, close the Group Policy Window and Restart your computer for the changes to be made.
Modify the Windows System Registry Settings to disable the “Autoplay” feature on all drives
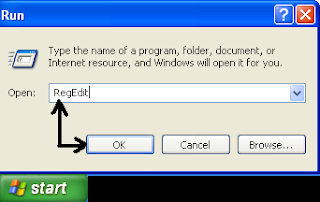
1. Go to Start > Run, and type RegEdit in the Open field and then click OK to open the Registry Editor Window.

“RegEdit” run command to open Registry Editor
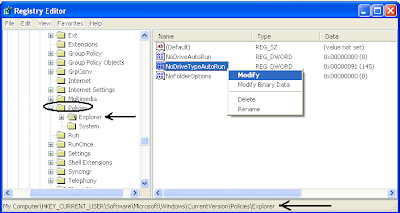
2. From the left pane of the registry editor window, navigate to the following registry entry.
HKEY_CURRENT_USERSOFTWAREMicrosoftWindowsCurrentVersionpoliciesExplorer
3. In the right pane find a DWORD Value named NoDriveTypeAutoRun and right-click on it and then click Modify.

Modify “NoDriveTypeAutoRun” DWORD Value in Registry
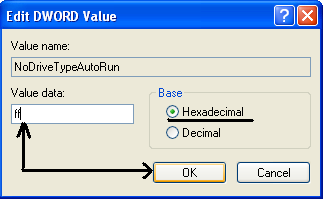
4. Now, edit DWORD Value NoDriveTypeAutoRun by changing its Value data from the default 91 to ff (hexadecimal base) and then click OK.

edit DWORD Value
5. Exit Registry Editor and reboot your PC for the changes to take effect.